Language packs add additional display, help, or proofing tools. You can install language accessory packs after installing Microsoft Office. Just follow the two steps below. If a language accessory pack is described as having partial localization, some parts of Office may still display in the language of your copy of Microsoft Office.
You can download language pack from here:
https://support.office.com/en-us/article/Language-Accessory-Pack-for-Office-82ee1236-0f9a-45ee-9c72-05b026ee809f?ui=en-US&rs=en-US&ad=US#ID0EAACAAA=2016
Step 1: Install the language accessory pack
The language accessory pack files are available for download for either the 32-bit (x86) or 64-bit (x64) architectures of Office 2010, 2013 or 2016. Select the version of Office you're using from the tabs below, then select the language desired from the drop-down list.
Finally choose the appropriate architecture (32-bit or 64-bit) from the download links provided.
Step 2: Configure Office language
After you install the language accessory pack, you must configure Office for your new language preferences.
-
Open any Office program and then click File > Options > Language.
-
Under Choose Editing Languages, make sure that the language you want to use is added to this list.
-
If the language accessory pack includes proofing tools for that language, the Proofing column shows Installed.
-
-
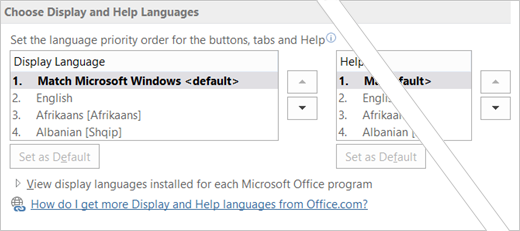
Under Choose Display and Help languages, you can change the default display and help languages for all your Office applications.
-
If the language accessory pack contained display and help for the language, you should see it listed here.

-
-
Restart all Office programs for your changes to take effect.
Comments
0 comments
Please sign in to leave a comment.